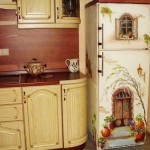
The Art of Decoupage
Translated from French, “decoupage” means “to cut out”, and the art of decoupage is consistent in the “the decoration of the surface of an object with paper cut-outs.” This process gives the cut-outs an appearance of depth and an impression that the pattern is actually painted on the object. Decoupage is a really funny way to decorate almost any object you can come up with. This art is mainly used on objects like small boxes, plates, vases, or candles. Nowadays, though, it is increasingly applied on furniture too, such as coffee tables, cabinets and even fridges etc. You can freshen up old furniture and mask scratches and signs of wear&tear.

1. Getting Started
In order to get started here is what you need:
– an object, you will decoupage; (obviously)
– the paper you want to use for the purpose – tissue paper, newspapers, book pages, magazine clippings, rice paper, music notes, thin fabric pieces;
– crafting scissors, glue, varnish or lacquer;
2. Prepare the surface of your object of choice. It is important to get the surface clean and dry in advance. This will help the cut outs stick better. For best results sand the surface of the object in order to remove bumps and imperfections if necessary. This will help the paper glue better and look good.
3. After you have done all the preparation begin by applying the glue on the surface of the object. After that simply apply the pieces of paper on the surface on top of the glue. You have to do that quickly, carefully and piece by piece. Try not to bend or clumple the paper and use your fingers to smooth it out. Once you are advanced and feel comfortable you can go for a bolder decoupage project in which you will have to apply a few layers of cutting outs. This will add for a more dramatic and complex appearance.
4. After the paper glue has dried and the paper is stuck to the object, apply varnish to seal it.
5. Sand the sealed decoupage object again and enjoy it!
I am sure you still need more guidance on how to do it, therefore here is a video tutorial that will help you understand the technique better:

- How to Get Ready for The Spring Cleaning - August 27, 2018
- How to be more productive if you are a work-at-home mom - January 11, 2018
- Last Minute Halloween Party Ideas for Toddlers - October 30, 2017
decoupage, diy, do it yourself